 Español
  Inglés
 ¿How does my rented camper work?
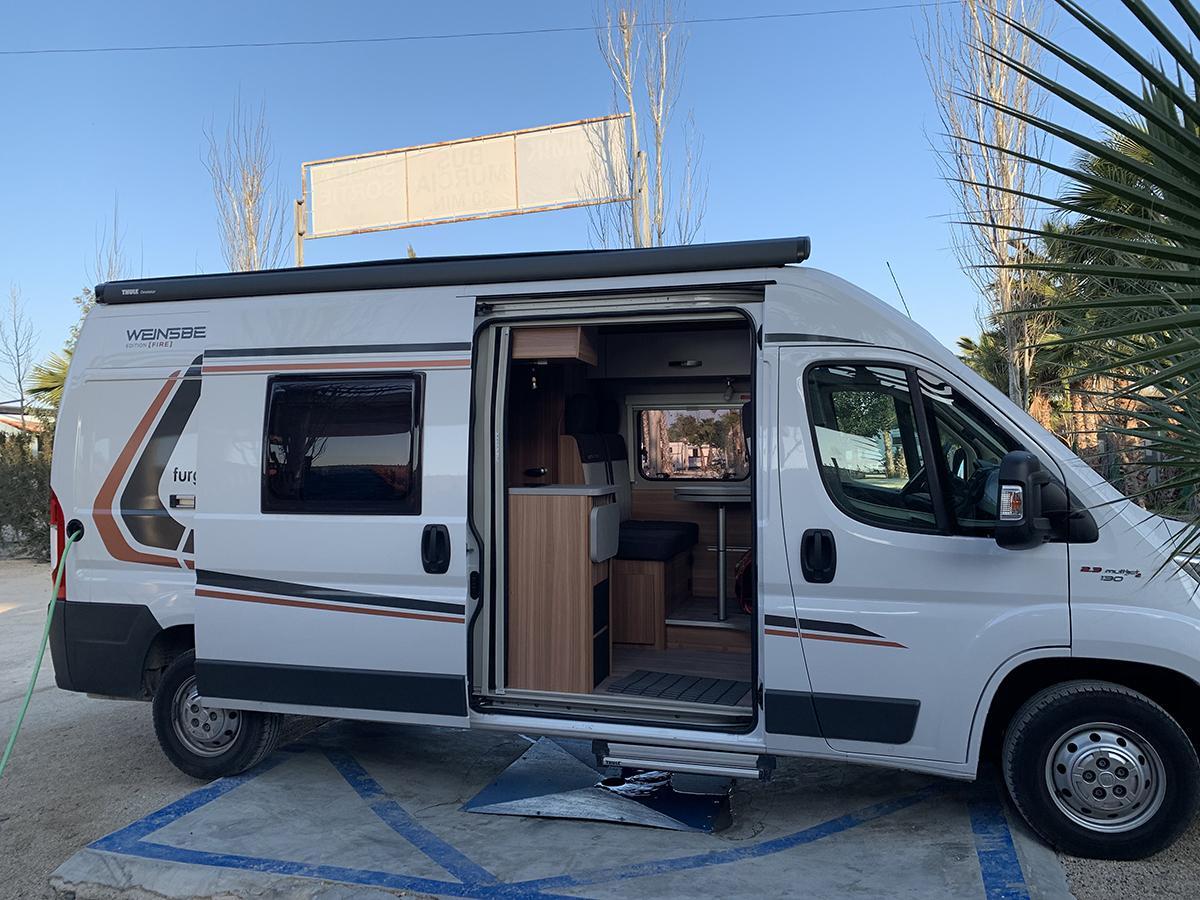
In recent years, High-Volume Campervans have proliferated significantly and have gained an important place within the Caravaning sector.
We believe this is due to the optimization and improvement of certain equipment, especially electronics, which have allowed these vehicles, in much smaller spaces, to offer the same basic comforts as a larger motorhome. We are talking, for example, about the increased battery capacity, reduced lighting consumption, LED lights, and more efficient heating and water systems.
At the beginning, especially if it's your first time with a motorhome, you may not know how some of these systems work or, by using them, you may have questions about their proper use, care, and maintenance.
Don't worry! It's very easy. And to help you, we have created this section where we explain in detail how each of the equipment installed in your camper works (we omit the multimedia or Bluetooth device in the vehicles, as they come in many different types and models).
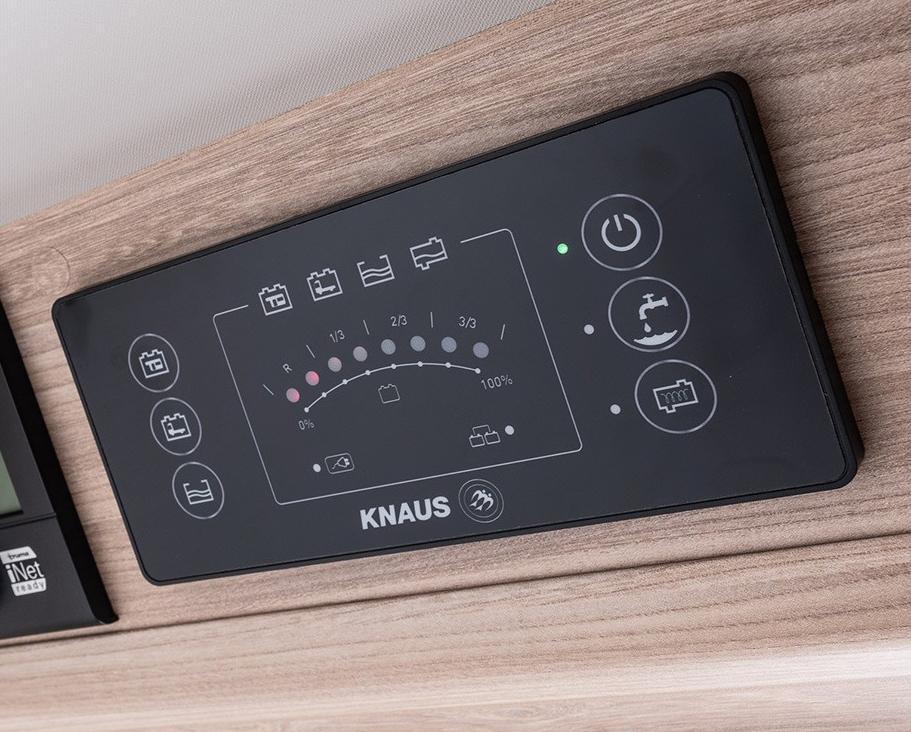
The control panel: Battery and Water Status Control
All our campers come equipped with a control panel that serves the following purposes:
- Turn on the electricity circuit.
- Activate the clean water pump.
- Check the battery charge status.
- Monitor the remaining amount of clean water in the tank.
- Check if the gray water tank is full (above 75% capacity).
- Occasionally, turn on the exterior lighting of the vehicle (an accessory that not all our campers have).
- Occasionally, activate an alternative heating system that uses black water (which we have never installed in any of our campers so far; it's less common).
The operation is very straightforward:
- Regarding battery and water levels, simply press the button, and the status bar will indicate the level.
- The gray water icon (top right), which is the only one without a verification button, lights up and blinks when the gray water exceeds 75% capacity, indicating that it's time to empty it.
- To the right of the panel, you'll find the buttons to turn on the electricity and water pump. These are also activated by touch, and indicator lights will show whether they are on or off.
Electricity for the "living space"
Our campers have two electrical systems, and you can check their charge independently using the control panel:
The vehicle's electrical system, which functions to power the engine and dashboard elements, just like in any vehicle.
The habitation or "living space" system, which provides power to the other elements of the camper, including heating, lighting, refrigerator (depending on the model), water pump, etc.
The habitation system operates with one or more batteries that provide 12-volt electrical service to the lights, refrigerator, heating boiler, and some USB and cigarette lighter charger inputs found in the vehicles.
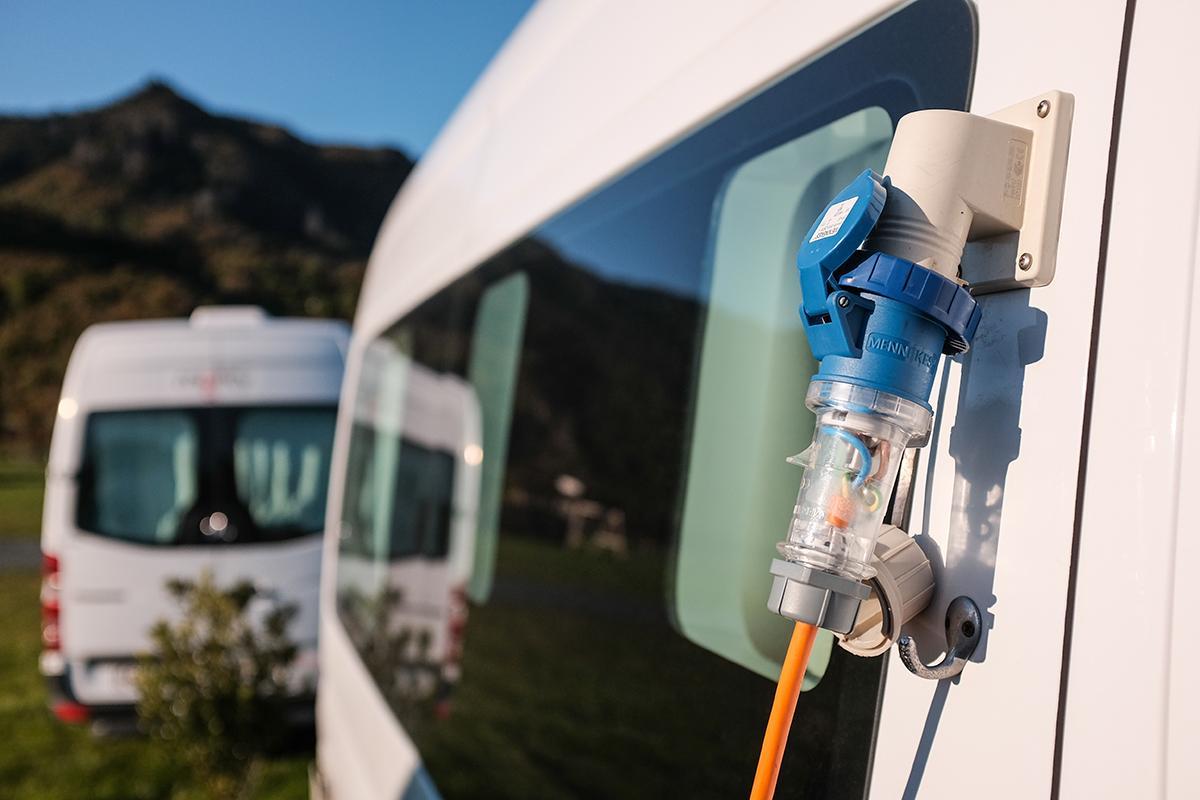
The batteries are charged both when we start the vehicle's engine (while driving) and when we connect the camper, via a cable, to a 220-volt electrical network. In this case, some outlets that previously did not function in the vehicle will also provide 220-volt service.
Some of our campers, depending on the estimated electrical consumption related to the operation of their components (for example, some refrigerators run on gas and require less electrical capacity), have either dual batteries or a solar panel installed to increase their electrical capacity. In any case, whether you choose solar panels or extra batteries, all our campers have sufficient and similar capacity; we wouldn't say that one solution is better than the other. They all work equally well.
While it is true that if you plan to stay in one place for several days and there is a risk of insufficient sunlight for the solar panels or that consumption exceeds the charging capacity, it is recommended to connect the vehicle to a 220-volt network. This can be done at many motorhome areas or campgrounds that offer these services as part of overnight stays.
It is also advisable, if you intend to charge many devices at 12 volts, to use driving periods, while traveling with the engine running, or when plugged into a 220-volt source, to charge as much as possible. Once parked and running on 12 volts, try to minimize battery consumption.
FURGOCASA provides with all its campers the connectors and extension cords necessary for you to connect your vehicle to a 220-volt network.
Propane Gas: Cooking, Heating, and Hot Water
All our campers have a compartment in the rear, accessible from the trunk, where propane gas bottles are located.
Propane gas primarily serves the kitchen burners, heating system, and hot water, and occasionally, the refrigerators (when they run on gas and not electricity).
The gas for our vehicles is provided by Furgocasa. We supply customers with gas bottles for their trip. If, for any reason, the bottle runs out of gas, the customer can refill it at any gas station they come across during their journey, and Furgocasa will cover the cost of the refill.
During the journey, the gas bottles should be closed to prevent major risks in case of accidents. Once parked, before using any appliance that requires gas, it must be reopened. This is especially important for the heating and hot water system because if we attempt to turn them on without having opened the gas beforehand, the system may become blocked after several unsuccessful ignition attempts. The same applies to gas refrigerators, which can also become blocked if the gas is not opened after several unsuccessful ignition attempts.
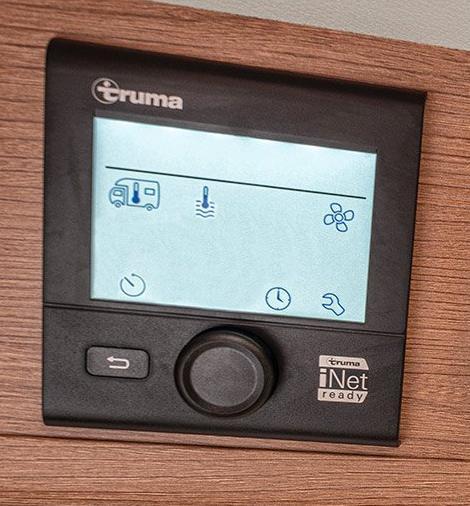
Heating and Hot Water
As mentioned earlier, gas allows the camper to have heating and hot water. There are also some models that use the vehicle's own fuel as a heat source. Generally, both of these functions can be controlled from the same control panel.
One of the most common systems is the Truma brand.
The operation is very straightforward. The panel consists of a screen and two buttons. The left button, rectangular in shape, serves to go back. The central button, round in shape, is a rotary knob that can be clicked, allowing us to turn it to select and navigate through the menu.
Pressing the central button turns on the screen, and by turning it, you can navigate through the menu items. In this case, we are mainly concerned with three:
The icon of a camper with a thermometer: this is for the heating.
- When this icon is selected, if you click the central button, you will access a "thermostat" that allows you to choose the desired temperature by turning the knob. Once the desired temperature is reached, press the button again to set the temperature.
- To turn it off, repeat the process but set the desired temperature to 0 degrees.
The thermometer icon over the water: this is for hot water.
- When positioned over this icon and pressing the button, you access the hot water menu, which allows you to choose between OFF, ECO, HOT, and BOOST. The difference between these modes is the temperature they achieve and the speed at which they reach it.
- To turn it off, access the menu again and choose OFF.
- When it's turned on, an icon similar to the hot water icon will appear above, blinking while the water is heating and remaining in a fixed position once the programmed water temperature is reached.
The third icon, similar to a fan, is used to set the airflow of the hot air from the heating system.
Refrigerators
All our campers are equipped with refrigerators, and their capacity and efficiency depend on the camper model and the type of refrigerator (what energy source they use).
We can say that all refrigerators basically operate in three ways:
- At 220v: when the camper is plugged into the electrical grid.
- In electric mode while driving: which utilizes the charging that occurs when the vehicle's engine is running.
- In stationary mode:
- It can operate at 12v using the vehicle's batteries.
- It can operate on gas, using propane.
When a refrigerator is "electric," it automatically switches between usage modes. It's important to note that these refrigerators consume more electricity, so if left running for an extended period without charging, they can deplete the vehicle's battery.
When a refrigerator is "gas-powered," there's also the possibility that it will attempt to switch modes automatically. In such cases, it's essential to consider that it's recommended to travel with the gas bottle closed. When you stop after driving, you should open the gas bottle before it attempts to change modes (this usually takes about 5 minutes). If you don't do this, after several attempts, it will lock, and you will need to reset it, which is easily done by holding down the warning button.
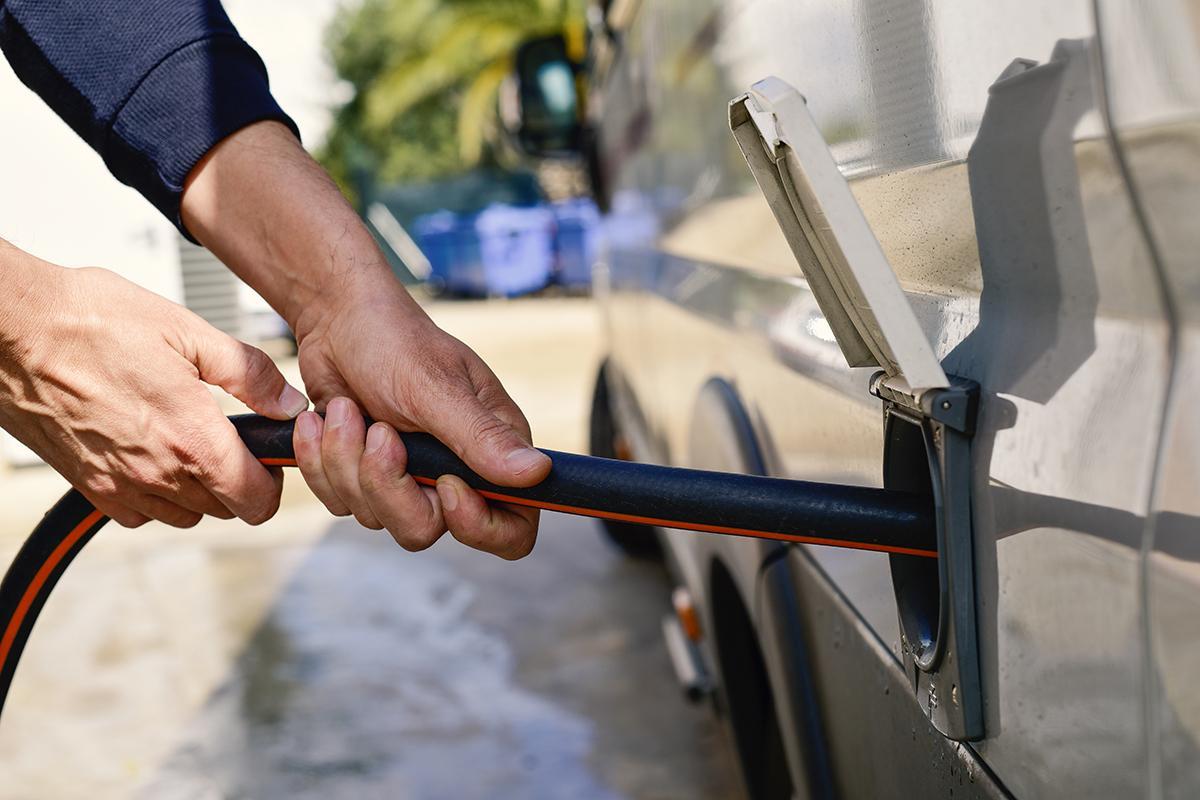
Freshwater Tank
Camper vans have a freshwater tank, usually with a capacity similar to that of the gray water tank, which collects used water below it. The tank's capacity varies depending on the model, but in campers, it typically ranges between 75 and 90 liters.
This clean water is what flows through the faucets, shower, and toilet when the electric pump is turned on.
The freshwater tank is filled from the rear, on one side of the vehicle. The filling point has a cap that opens with a DIFFERENT KEY THAN THE ONE USED FOR THE VEHICLE (the same key used to access the toilet compartment).
Before opening the tank, it is crucial to make absolutely sure that the hose you have in hand is for clean water; under no circumstances should you fill the tank with other substances such as fuel, lubricants, etc. If, by mistake, a different liquid is introduced into the tank, it is of utmost importance not to turn on the electric pump or open any of the faucets until the tank has been emptied, cleaned, and possibly replaced. Otherwise, corrosive liquids could enter the water and heating system, causing significant damage to the vehicle.
FURGOCASA provides all the campers with the necessary hose and connectors to fill the freshwater tank of your vehicle.
Gray Water Tank
To collect all the water that comes out of the faucets and drains through the sinks and shower, campers have a gray water (wastewater) tank installed on the bottom. This tank has the same capacity as the freshwater tank, and you can check if it's nearing full when the flashing gray water indicator light on the control panel turns on after it exceeds 75% of its capacity.
To empty it, campervans have a valve on one of their sides, either a twist or pull-type, that opens the drain and allows the water to flow out.
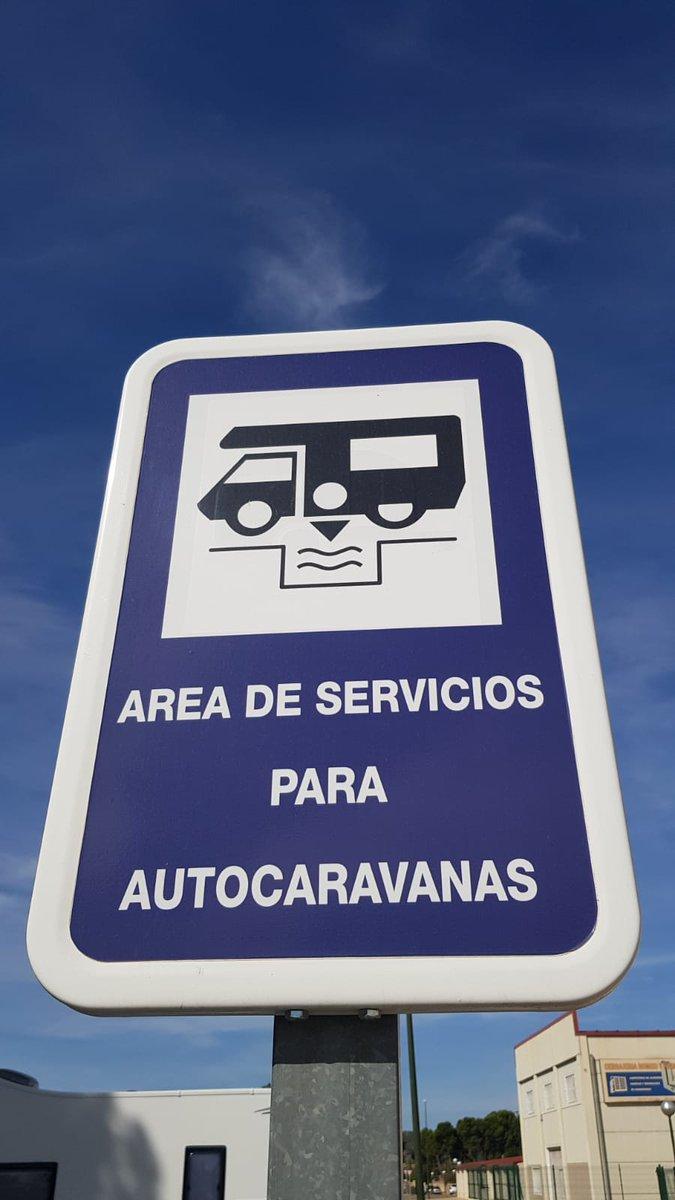
These are contaminated wastewater, and they cannot be discharged just anywhere. On the contrary, they can only be emptied at designated camper areas or campgrounds with wastewater dumping facilities. These facilities are available throughout the national and European territory and are usually identified with a sign:
Black Water Tank: Chemical Toilet
Naturally, the camper is not connected to a sewage system that would allow waste to be flushed away and sent through pipes to the nearest treatment plant (yes, people have asked this question!).
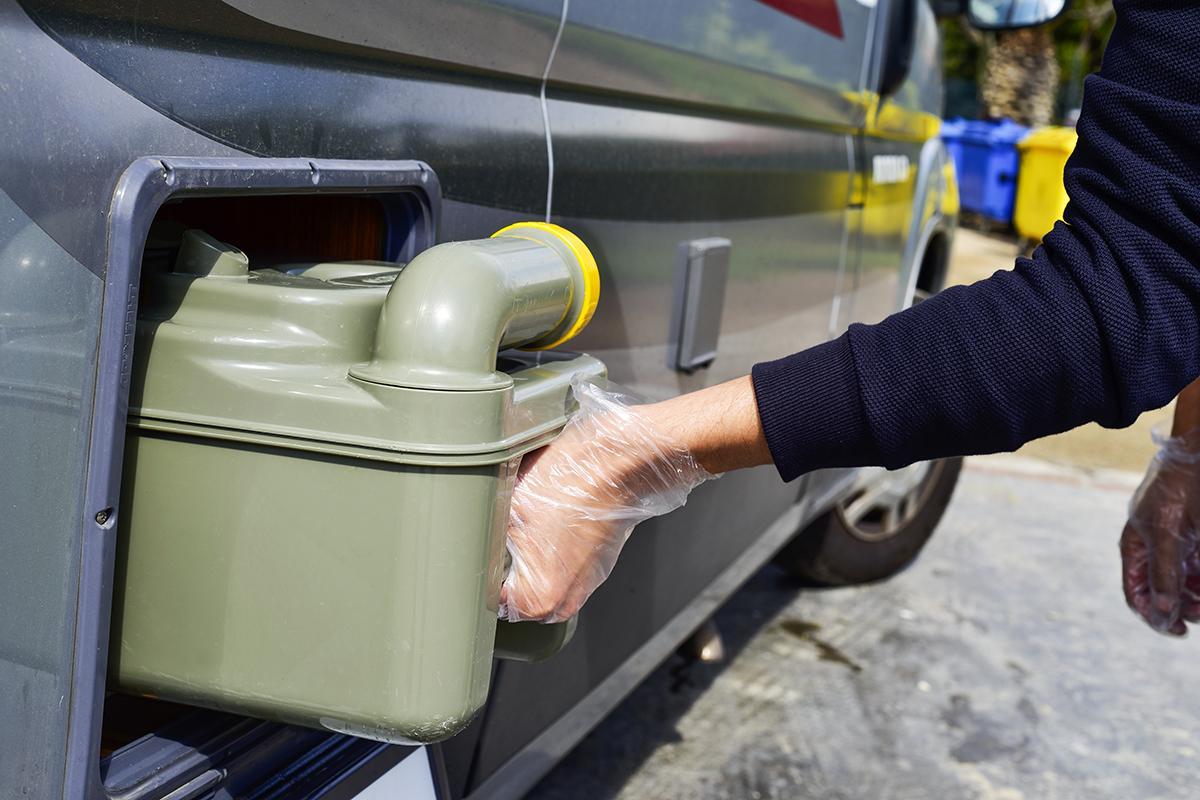
On the contrary, similar to how it works on boats, there is a tank, or container, located beneath the toilet that collects waste, and you must empty and clean it regularly, depending on your usage.
To combat odors and the proliferation of "other forms of life," a special tablet (or liquid) designed for chemical toilets is added after each emptying and cleaning.
The black water tank is located beneath the toilet.
To use it from inside the camper, you need to open it by turning the lever located on the toilet itself from inside the bathroom (opening it reveals the interior of the tank). It's VERY IMPORTANT to ensure that the tank is open before using the toilet because, otherwise, there can be leaks and spills outside of the tank that can penetrate and seriously damage the interior woodwork.
Once used, you should close it again; this is important to prevent odors, potential overflows, and most importantly, because it must be closed to be removed for emptying and cleaning (otherwise, you can break the seal).
To empty and clean it, you need to open the exterior door of the compartment located on the side of the vehicle. This exterior compartment has a door that is opened with the water key. This key is different from the key for the vehicle itself and is also used to open the fresh water tank, as mentioned earlier.
Remove the tank and empty its contents, positioning it comfortably and opening the elbow, at a designated black water dumping area. Similar to gray water, the contents of this tank can only be emptied at designated camper areas or campgrounds with wastewater dumping facilities.
Dealing with Odor Issues: How to "Solve" Them?
As camper users, we are aware that one of the less pleasant aspects of the experience can be the odors caused by gray water and, especially, the chemical toilet.
In the case of the gray water tank, it's essential to consider that it collects everything we pour down the drains. So, if we dispose of food scraps, coffee, other beverages, or even use it for minor bathroom needs while showering, all of these combined and decomposing can lead to odors inside the vehicle to varying degrees. Our recommendation is to be mindful of this and try to mainly pour water into it, along with any cleaning products that may have been used or soap from the shower, and little else.
The odor from the chemical toilet can be even worse. Naturally, depending on how frequently or intensively the tank is used, the odor can develop more rapidly or become stronger. In this case, we recommend using it as sparingly as possible and taking advantage of any opportunities during your journey to use other restrooms outside the camper. This doesn't mean it shouldn't be used; on the contrary, it's there to be used when there's no other option (at night, when other restrooms are unavailable during travel, etc.). But the less it's used, the better.
In both cases, it's also advisable to regularly and thoroughly clean both tanks.
For the gray water tank, after emptying it, you can add a little clean water with a cleaning product and leave it so that it can move and clean itself during a planned long trip, eliminating odors.
Regarding the toilet, it's advisable, during each emptying, to fill it a quarter of the way with clean water and some cleaning product, shake it well, empty it again, and repeat the process as many times as necessary until the water runs completely clean.
Lastly, it's recommended to use air fresheners and odor-eliminating products to "mitigate" the issue.
También es recomendable, por último, hacer uso de ambientadores y productos eliminadores de olor a fin de “mitigar” el problema.

